
Rat in a Box

First of all, not trying to keep the rats locked up in their cage makes selecting a cage a lot easier. (see "reverse psychology technique") No tubes to build, just plop a few cages down next to each other and you're set. Of course, some of you have other animals in the house that might actually try to be predators, unlike my cats who fear anything larger than a bug. Or you might have female rats, or an unusually adventurous male rat, who will fling themselves over the side just because they can. So maybe I'll get to that later. Or maybe not.
My wire cage was sort of a "modification of the month" cage -- I was always changing it for the better of the rats. In fact, in some sense, for many years I only ever owned one wire cage, if having only the same litter pan and door qualifies the final version as being the same one I started with. Let's follow the progression:
Wire cages have advantages and disadvantages, but the first one I owned mostly had disadvantages. It was constructed of 1" x 1/2" wire mesh, including shelves and the bottom, which seemed specially designed to catch a rat's back foot and twist it around horribly. Young rats get their feet caught while playing, adults get them trapped while asleep, and older rats who start to loose feeling in their back feet can get them stuck in just about anything. Plus, wire floors put a lot of pressure in a small place on a rat's foot, which often cause a sort of chronic infected open sore called bumble foot. Bumble foot often requires surgery (and sometimes multiple surgeries) to cure, if even that works. So if you have wire floors (especially 1" x 1/2", but really any size wire mesh) it's just a matter of time before one of your rats will get injured. If you have ever seen a rat with its foot trapped, flailing around in a panic and screaming, all the while twisting its leg to near the point of breaking, well, it's not something you ever wish to see again. So don't let your rats walk on any wire floors, shelves, wheels, or anything, ever!
The wire and floor pan were bare galvanized metal as well, and I've been told that rats can get zinc poisoning from walking on bare wire mesh & licking their feet. And the wire started corroding after a year or so. So avoid anything but vinyl or powder coated cages! Strangely most wire cages in pet stores are made of exactly this kind of galvanized 1" x 1/2" wire mesh with a wire mesh floor and a metal bottom. Thus I eventually decided to re-build my own rat cage.
If you look around hard enough, you can find some hardware store somewhere that will sell you a special "J-clip" or similar pliers like tool and some small metal bits which you can use to join pieces of wire mesh together. (Ok, that's a lousy description, but it is late. Email me for a better one, or I'll post an image when I find a freaking scanner.) Actually it took me quite a while to find a store that sold these. If you are trapped in California like I am, you might look at Orchard hardware. Then you just need to pick a wire mesh to use.
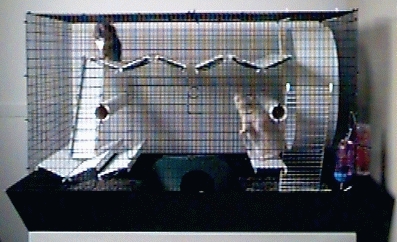
Now, if you look at some more hardware stores (not Orchard, or at least not the local one) you can find a wonderful invention -- VINYL COATED WIRE MESH! No zinc poisoning, no corrosion, cleans up real easy like, and my rats have never shown any urge to gnaw upon it. I found two sizes, 3/4" square and 2" by 3". The 3/4" square stuff does not have the structural integrity to stand on its own (except maybe as small tubes) so I joined it to the thicker 2" by 3" stuff, and made a roughly 22" x 22" x 24" cage. This, along with a 10 gal. aquarium, supplies plenty of room for my two rats. (If you want to make something bigger, you'll have to use some sort of frame, which I might recommend anyway unless you can find sturdier wire mesh than I did -- this cage dented easily.) The floor is a 22" square pan from the first cage, covered with plexiglass, with no wire mesh over it. (The plexiglass had a problem of trapping stuff underneath, so I eventually painted the pan with a waterproof, non-toxic paint designed for children's toys. It wasn't very sturdy paint, though.)
I made a second level of what I thought was a safe size of wire mesh, which it was not! So I later replaced it, see below. I made some climbing tubes out of scrap pieces of wire mesh also. It has two doors (one from the first cage) for easy access to rats and rat accessories (and later a completely removable top for the same reason.) I did all this (including buying the tools) for about what I would have paid for in a pet store to buy another standard 1" x 1/2" rat foot destructo cage of equal size. (Special tool about $8, bag of connectors a few bucks, and each of the rolls of wire mesh were around $15 I think, but they were really big rolls, enough for several cages. So the total was about $40 US.)
The rats really liked this cage for its size, and for how cool it is in the summer, when they usually sleep on top, so that whenever I looked up from my computer they looked like road kill from underneath. Especially when they sleep on their heads. Why do they sleep on their heads anyway? How could any animal sleep with its head twisted around and underneath itself in such a grotesque manner? How do they even breath? But I digress.
As my rat Jabberwock got older, he started to loose feeling in his back legs, and it became apparent that he had gained the special ability to get his feet stuck anywhere it was even slightly possible, no matter what vast amount of imagination required. The shelf, constructed of both the 2" x 3" and the 3/4" square mesh, gave him several opportunities, so it had to go. It wasn't the right size to hold and trap his foot, but he could sure wrench his leg when he was in a hurry, or climbing down the side. Some people assume that when a rat gets old, it will quit using parts of the cage that have become dangerous to them, but it just doesn't work that way. I've seen rats with almost no use of their back legs at all pull themselves to the top of a cage. So really I wanted to replace even the top of the cage. But first things first.
I decided to make solid shelves. The first complaint you will always hear about solid shelves is that the rats pee there, and it just sits in a pool. (And then the rats sit in the pool.) So I wanted the shelves to be able to drain, and/or shelves that were easy to get to and clean. But how? Off to the hardware store again . . .
So here's what I did: the shelf in my rats' cage was made of three solid slats, each about 4" by 20". These are PVC channel, from the local hardware store -- they have lips on the side, about 3/4" tall, which I have pointed down. (They rest on two 20" long wires, indicated by the "o"s below.) This stuff is called something like EZ channel, and is used for glass blocks. So look in the glass block section of the hardware or building supply store. (I always get them at Home Depot, but 9 out of 10 Home Depot employees have no idea what the stuff is or where it is in their store.)
	     ^       -------------------------
            3/4"     | o                   o |    20" into your screen.
             v                <- 4" ->
Now here's the trick: they were mounted parallel with a small gap (about half an inch) between them, and tilted slightly, so that one side across the 4" width is not quite an inch higher than the other, in a pattern like this: \\/| <- side of cage. (tilt not to scale!) Thus most things the rats left up there ran down the slight slope, and no puddles were left. The shelves tilt together, so gravity will not guide a sleeping rat off the shelf. And the tilt is slight enough that the rats had no trouble walking on it. Oh, and the shelves just rest on two wires each, held in place by gravity alone, so if a foot were to slip through, the whole shelf could easily move when the rat pulls it out. Nothing to get trapped in! (My rats delighted in taking the whole shelves down for about the first month they were in the cage. Later on they just delighted in sleeping with their tails hanging down through the gaps, and got a really funny look on their faces when I touch their tails.)

Plan (B) would have been to get some of that plastic roofing material, you know, the wavy stuff (like a sine wave from the side) and drill slots or holes in the "valleys." There were two problems with this, in that since it's only about 3" from peak to peak, I'm not sure it would be very comfortable, and the smallest piece I could buy was something like 8' by 4', where I only needed about 1' by 2'. But if anyone wants to give it a try, let me know how it turns out.
My last modification was to make the cage another 9" taller so that I could add lots of ropes and hammocks and climbing tubes. The tubes I use are flexible 3" or 4" diameter plastic water drainage pipe -- the ribbed sides give the rats something to grab & climb with, and you can bend them into any shape you want and hold them in place with cable ties. (Well, the 3" bens a lot easier than the 4", but it's harder to find.) The ropes are 3/4" diameter polyester rope (don't use sisal!) which is easy to clean. And the cage top is completely removable now. It's a bit tricky to explain how to make a cage with no top and bottom still stable, but suffice it to say it needs a partial top. With no top, it's easier still to get at rats, and I don't have to worry about them walking on the one last horizontal wire mesh surface that was left on the cage.
What were the problems with this cage? Well, it looks like Dr. Frankenstein's second grade school project for one thing. It's big and spacious, sure, but it's not real pretty. For another, it's flimsy -- the 2" x 3" vinyl coated wire mesh bends too easily, and can get beat up just on the way to the car wash and back. And I started to think I'd like my rats to have more horizontal running room than just a 22" by 22" floor, say something more like at least 2' by 3'. So yes, eventually built a whole new cage, as you can read below, and this one was donated to BARMCA's Rat Rescue project.
As for what you should put in your rat cage. Rats like to have houses within their houses, so I made one from a plastic planter. I found one which is 10" across at the top, and shaped like half a sphere (with a slightly flattened bottom so your plant doesn't fall over) about 4" tall. I flipped it over, cut a hole in the side (by twirling my compass around and around until it cut through) and viola, instant rat hut. Perfect size for two or three rats. (You can get larger ones for more rats.) Easily washable. The rats can move it anywhere they want, but it doesn't flip over easily like kleenex box houses do.
Other details: I used to have a 12" wheel in the wire cage, but even 12" wheels are too small for an adult male rat, so I now have one of Fern's 15" sheet metal wheels with a powder coating. It's actually 16" across, and doesn't easily fit in a small cage. I've also tried 12" Wodent Wheels from Transoniq, which my rats LOVED, but they can get messy. If you look on the RMCA page, you'll eventually be able to find a review I wrote on the Wodent Wheels for the Gazette.
The cage does have doors (made from stiffer non-vinyl covered wire mesh) and a top (which is off most of the time) so that I could shut them away if I was going to be gone for a few days. And I make sure there are always at least two water bottles in the cage, usually 3 if I'll be away for a while. This is because the things occasionally jam, and if there is no backup your rat will get very thirsty. I have one rat right now who likes to give himself baths while standing in a bowl of water, but I have not yet figured out a good way to incorporate this into the cage. (Maybe a large heavy high sided dog bowl?) Sometimes I string up some ropes in the cage, as I mentioned above. Even fat old boys are amazingly agile on ropes, and will climb onto them willingly. Young rats will live in levels made of ropes, hardly ever leaving them for solid ground. Hammocks are also popular -- don't pay a lot for them, though, as rats will often destroy them. I made hammocks out of old socks and shirts.
I've gone through a few cages since I wrote the stuff above. For a while I needed to keep Chupa and Mori in a separate cage, so I built one using a rubbermaid underbed storage bin for the tray, and wire mesh (1" square) for the cage. I was able to build a 14" by 30" base, 22" tall cage this way, plenty big for two small rats. (The 1" square mesh is TOO BIG for females or very young males, though -- they can get their heads through it or caught in it.) I have to say I really liked the plastic tray -- it was light, durable, and cleaned easily. This cage also used the shelves I mentioned above.
Note that if you design a cage with one of these trays, be sure to carefully measure the inside of the bottom of the tray -- the one I used has outside dimensions of about 34" x 16" or so, but the largest cage that would fit in it was 30" by 14", due to sloped sides and rounded corners. But this was actually an advantage -- it formed a moat around the outside of the cage, and made it much more difficult for the rats to shove litter out!
But eventually the time came when I wanted all my rats on one cage, and I wanted that cage to look like it wasn't something I had just thrown together. So my current cage was custom made by Fern Manufacturing, has a 2' x 3' base, and is 2' tall. The tray is 5" deep, and the sides tilt away from the cage to replicate the plastic tray's litter moat. The tray is metal, and the whole thing is powder coated black. Oh, and the cage is held together with cable ties, so when I move, I snip the ties, and it all folds up into the tray. The top is 1/2" square wire, and the sides are 1" x 1/2" wire. If I had it to do over, I would be tempted to make the sides 1/2" square as well. Also, I don't like the metal tray nearly as much as the plastic ones I used on the cages above. It came with powder-coated metal shelves, but they are kind of cold and tend to attract, well, stuff -- so I've replaced them with the removable plastic shelves I mentioned above.
Going along with the "folds up in its own tray" idea (which is very popular with those of us who move a lot) I used the same sort of plastic tray as above to make a second 30" x 14" base, 14" tall temporary cage.
Now, you might not want to have to build your own cage. In fact, I wish I had just been able to buy a good one in the first place without special ordering the parts. (A cage the size of my current one, built right, costs around $100 to $200.) If you want to do that, just make sure you get a powder coated cage. It's a baked on paint, a lot better than the vinyl coated stuff I'm using. (I've seen some epoxy painted cages, such as those made my SuperPet, which look nice, but I have no long term experiance with them.) And as I said before, make sure the floor and shelves are solid. If the pan is galvanized metal, make sure it's powder coated. And NO HORIZONTAL SURFACE SHOULD BE 1" x 1/2" WIRE MESH! This includes the top of the cage if you plan to let the rats up there.
Fern Manufacturing in southern California that I ordered my custom cage from makes several standard rat cages, designed in cooperation with the RMCA. They also make sheet metal wheels, and (as you might guess!) they can build custom cages as well. You can call them at (818) 365-2615 for more info. I've also recently seen several SuperPet cages that I've been quite impressed with, although they tend to have wire shelves. You may be able to find a local cage company willing to build a proper rat cage as well.
Debbie Ducommun suggested rabbit food pellets on the rec.pets usenet group a while back, and I used the stuff for nearly a year. It's more absorbent and better at controlling odor than any other litter I have tried. It's heavier than corn cob, but my rats still like to shove it around and make odd landscapes with no clear purpose. I just buy it in the 50 lb. bags for about $8. It works better than any other litter I have tried. Avoid the dusty brands, that's bad for your rat.
Other popular options are Carefresh and Sani-Chips. I finally got some Sani-Chips, and I really like them, although they seem to make my allergies worse! They are tiny heat treated aspen chips, and are very absorbent for a wood chip type product. The only disadvantage is that being so small (about 1/4" squares) they get scattered everywhere. Sanichips cost around $12 for a large bag, comparable to the cost of the evil pine shavings. Carefresh is a sort of recycled paper pulp based stuff. When I first got it in a big plastic bag in the pet store, I really didn't like the way it smelled once it had been used. (Neither did my rats.) However more recently I've been getting lab grade Carefresh in paper bags through a laboratory supplier, and it's much better. So recently I've been using Carefresh on top of either rabbit food or something similar like Critter Country, a pellet litter make from grass. (It looks just like Rabbit food, but grey, and works about the same.) The one downside of Carefresh is that it's pricey unless you can find a lab supplier -- I pay about $8 for a 50 liter bag. The 50 quart bag in pet stores goes for upwards of $16.
I also have been using Eco-Bedding as a nesting material. It's this stuff that looks like wrinkled up grocery bags put through a paper shredder. It comes in a small box, but it expands quite a bit, and it great if your rats like to build nests. (But alone it wouldn't make a good litter.)
FYI, if you can't find them locally, you can call about Sani-Chips or CareFresh. Sani-Chips are made by P.J.Murphey Forest Products, 1-800-631-1926. CareFresh is made by Absorption Corporation, 1-800-242-2287. Better yet, convince your local pet shop to start carrying one of these products instead of cedar or pine.
Well, that's all I can think of for now. I'm sleepy, and I wanna go home now mommy! So maybe I'll actually read through this thing someday and edit for content/mistakes/spelling errors/absurd concepts/etc. But probably not.
 Return
to rats
Return
to rats Return
to home
Return
to home